Sunday, March 25, 2018

AR Receipt and Bank Statement Reconciliation oracle apps


When the AR Receipt is Created and Applied to the Invoice based on the receipt class setup for the receipt method used in the AR transaction the Receipt status will change to Remitted or cleared.
If the Receipt class Matching setup is labelled as By Matching : In that case the Cash receipt status will change to Remitted,
The cash receipt needs to be reconciled against a bank statement to clear it off.

In order for this to happen we need to


  • make an entry for the bank statement
  • Select the receipt from the list of available receipts available for reconciliation
  • Once the bank statement is reconciled with the receipt the receipt status changes to Cleared and the bank statement line is reconciled.
Below SQL can be used to find out details of a AR cash receipt being reconciled with a bank statement
/* Formatted on 11/15/2016 11:52:30 AM (QP5 v5.114.809.3010) */
SELECT   cba.BANK_ACCOUNT_NAME,
         cba.bank_account_num,
         csh.statement_number,
         csl.STATUS,
         csl.amount,
         csl.trx_type,
         acr.receipt_number,
         arm.name
  FROM   CE_STATEMENT_HEADERS csh,
         ce_statement_lines csl,
         ce_bank_accounts cba,
         ce_statement_reconcils_all csr,
         apps.ar_cash_receipts_all acr,
         ar_receivable_applications_all ara,
         ar_receipt_methods arm,
         hr_operating_units hou,
         AR_CASH_RECEIPT_HISTORY_ALL ach
 WHERE       csh.STATEMENT_HEADER_ID = csl.STATEMENT_HEADER_ID
         AND csh.BANK_ACCOUNT_ID = cba.BANK_ACCOUNT_ID
         AND csl.STATEMENT_LINE_ID = csr.STATEMENT_LINE_ID
         AND csr.reference_id = ach.CASH_RECEIPT_HISTORY_ID
         AND csh.statement_number = :statement_number
         AND bank_account_num = :bank_account_num
         AND csr.REFERENCE_TYPE = 'RECEIPT'
         AND acr.cash_receipt_id = ara.cash_receipt_id
         AND acr.receipt_method_id = arm.receipt_method_id
         AND ara.org_id = hou.organization_id
         AND hou.name = :operating_unit
         AND receipt_number = :receipt_number
         AND acr.cash_receipt_id = ach.cash_receipt_id

Link Between Transaction Number and Receipt Number in AR

Link Between Transaction Number and Receipt Number in AR


SELECT ACR.RECEIPT_NUMBER RECEIPT_NO,
RCT.TRX_NUMBER INVOICE_NO
FROM
 APPS.AR_RECEIVABLE_APPLICATIONS_ALL ARA,
APPS.AR_CASH_RECEIPTS_ALL ACR,
APPS.RA_CUSTOMER_TRX_ALL RCT
WHERE
 ARA.STATUS='APP'
AND ARA.CASH_RECEIPT_ID=ACR.CASH_RECEIPT_ID
AND ARA.APPLIED_CUSTOMER_TRX_ID=RCT.CUSTOMER_TRX_ID ;

Receipt Status in Receivables


Receipt Status


A receipt can have one of the following status:
Approved: This receipt has been approved for automatic receipt creation. This status is only valid for automatic receipts.
Confirmed: The customer has approved the application of this receipt and their account balances have been updated within Receivables. This status is only valid for automatic receipts.
Remitted: This receipt has been remitted. This status is valid for both automatic and manually entered receipts.
Cleared: The payment of this receipt was transferred to your bank account and the bank statement has been reconciled within Receivables. This status is valid for both automatic and manually entered receipts.

Reversed: This receipt has been reversed. You can reverse a receipt when your customer stops payment on a receipt, if a receipt comes from an account with non-sufficient funds or if you want to re-enter and reapply it in Receivables. You can reverse cash receipts and miscellaneous transactions


You can check receipt status by following  navigation given in screenshot: 


Generally there is always confusion between Cleared and confirmed status, it depends on Payment method used during receipt creation:


Directly: Choose this method if you do not expect the receipts to be remitted to the bank and subsequently cleared. These receipts will be assumed to be cleared at the time of receipt entry and will require no further processing. Choosing this method is the same as setting Require Bank Clearance to No in previous releases of Receivables. 

By Automatic Clearing: Choose this method to clear receipts using the Automatic Clearing program. 

By Matching: Choose this method if you want to clear your receipts manually in Oracle Cash Management, so first the status of receipt would be confirmed and once reconciled in case management or receivables will chang to cleared.


Wednesday, March 14, 2018

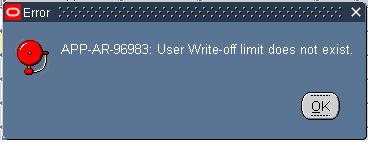
APP-AR-96983 : User Write-off limit does not exist


Today when I was working on Receipts (Oracle R12.1.3) and tried to write-off receipt application shows the error 'APP-AR-96983 : User Write-off limit does not exist' as illustrated below: 
Solution

Use Receivables Responsibility.
1. Define user write-off limit 
The Navigation Path is: Setup > Transactions > Approval Limit 
Enter user limit for each currency the user is allowed to write off 

2. Define system write-off limit 
The Navigation Path is: Setup > System > System Options > 
Miscellaneous (tab)
Enter Maximum Write-off Amount

3. Define receivable activity 
The Navigation Path is: Setup > Receipts > Receivable Activities 
Enter at least one activity with the type of Receipt Write-off

Reference
184887. 

Create Accounting Program:


Accounting transactions are originated as a result of normal business activities which are recorded in different modules of oracle application; The Create Accounting program processes eligible accounting events to create sub ledger journal entries. To create the sub ledger journal entries, the Create Accounting program applies application accounting definitions that are created in the Accounting Methods Builder (AMB).
The Create Accounting program:
·         Validates and creates sub ledger journal entries
·         Transfers the final journal entries in the current batch run to General Ledger and starts the General Ledger posting process(if instructed)
·         Generates the Sub ledger Accounting Program Report, which documents the results of the Create Accounting program
Create Accounting program parameters:
Ledger: If the profile option SLA: Enable Data Access Security in Sub ledgers is set to Yes, only those ledgers that are included in General Ledger Access Sets assigned to the responsibility appear in the list of values.
Mode: Three modes are available    
Draft:
·         will create Journal Entries, which are NOT final, which means they are NOT ready to be transferred to GL
  • You can run create accounting on this transaction again and again, which will delete the old journal entries and create new ones.
  • You can't transfer these journal entries to GL
Final:
·         This will create journal entries, which can be transferred to GL
·         Once it is finally accounted you can NOT run create accounting on the particular transaction (specifically on that event).
·         You can transfer them to GL using Transfer Journal Entries to GL program.

Errors Only: Required; limits the creation of accounting to those events for which accounting has previously failed.
If Yes is selected, the Create Accounting program processes all events with a status of Error.


Transfer to General Ledger & Post in General Ledger:
Accounting Mode: Final, Transfer to GL: Yes, Post to GL: No
  • It will create journal entries in Final mode, transfer them to GL.
  • You can see the accounting in XLA_AE_HEADERS and XLA_AE_LINES.
  • Once it is finally accounted you can NOT run create accounting on the particular transaction (specifically on that event).
  • Need to run Posting program separately       
  • It will transfer the journal entries to GL using Journal Import and you can find the data in GL_JE_HEADERS and GL_JE_LINES.
.          
Final-Post
·         This will create journal entries in Final Mode, Transfer them to GL and Post them.
  • Once it is finally accounted you can NOT run create accounting on the particular transaction (specifically on that event).
  • It will transfer the journal entries to GL using Journal Import and you can find the data in GL_JE_HEADERS and GL_JE_LINES
  • It will post to gl_balances also (GL_JE_HEADERS.status is 'P').

II. Transfer Journal Entries to GL Program:

The Transfer Journal Entries to GL program enables you to transfer any eligible journal entries to General Ledger, including those from previous runs that have not yet been transferred to General Ledger.

Note: This program is used if you run accounting online in Final mode (not Final Post) or if you run the Create Accounting program and set the Transfer to GL parameter to No.

The only reason you would want to run the Create Accounting program and set the Transfer to GL parameter to No is if you want to run accounting at different intervals than the GL transfer, for example, you may run accounting every hour but only transfer to GL nightly

Difference between Create Accounting and Submit Accounting

One major difference is Submit Accounting, launches Revenue Recognition program to generate the revenue distribution records for your Invoices and Credit Memos that use Invoicing and Accounting Rules
Create Accounting
Submit Accounting
Specific to AR module?
No
Yes
Runs Revenue Recognition automatically?
No
Yes
Can be run real-time for one Transaction/Receipt at a time [Online Accounting]
Yes
No

Journal Import in GL


Journal Import
In R12 the Create Accounting for each subledger populates the common XLA tables (Sub ledger Accounting). When the accounting is Final then the Transfer Journal Entries to GL process populates the GL interface and automatically submits the Journal Import. It can also submit the Post for the imported journals automatically.
Journal import loads data from the subledgers into the GL_INTERFACE table and then after performing validation on the data into GL_JE_BATCHES, GL_JE_HEADERS and GL_JE_LINES tables.

Submit Journal Import Run

Once the data is in the GL_INTERFACE table, you can manually submit the import process from the Import Journals form
Responsibility: General Ledger Super User
Navigation: Journals > Import > Run

Source: Select the Source from which source you want Journal Import to create journal entries, it can be Receivables, Payables, or spreadsheet etc.
Group ID: When the information comes from Oracle Applications subledgers, the value for this field is assigned automatically and is defined by the sequence GL_INTERFACE_CONTROL_S. The Journal Import process selects records based on SOURCE and optionally GROUP_ID. If you do not specify a Group ID, General Ledger imports data from the specified journal entry source with no corresponding Group ID (null Group ID)
Caution: Do not specify more than 20 Source/Group ID combinations per import. Journal Import cannot process more than 20 Source/Group ID combinations at once
Post Error to Suspense: If you allow suspense posting in your set of books, you can Post Errors to Suspense. With this option, Journal Import creates journal entries with suspense journal lines for account errors in the source data. If you choose not to post errors to suspense, Journal Import rejects any source/group ID combination that contains account errors.
Create Summary Journals: Choose to Create Summary Journals to summarize all transactions for the same account, period, and currency into one debit or credit journal line. This makes your reports more manageable in size, but you lose the one-to-one mapping of your detail transactions to the summary journal lines created by Journal Import.
If you choose to create summary journals, you cannot import descriptive flexfields.


Journal Import Correct

If your Journal Import run resulted in relatively few errors, you can correct the data that was rejected by Journal Import. After making your corrections, you can rerun Journal Import to create journals from your corrected accounting data.
In R12, the rows coming from subledger accounting are rolled back to the XLA tables and removed from the interface, so they must be corrected at subledger level and then transferred again, to avoid reconciliation problems between GL and the subledgers
Responsibility: General Ledger Super User
Navigation: Journals > Import > Correct

Journal reversal in GL


Journal Reversing Entry


Reversing entries are made on the first day of an accounting period in order to remove certain adjusting entries made in the previous accounting period. Reversing entries are used in order to avoid the double counting of revenues or expenses.
Example of a Reversing Journal Entry
Let’s consider example of payables ,to develop the project ABC Corp Hire XYZ Corp from 1st July to 30th July for 10000$, but XYZ Corp will provide invoice in Month of August, but ABC Corp bound to show this expense in July accounting sheet.
So accounting entry in July would be:
Account
Debit
Credit
ABC Expense
10000
Accrued Expense
10000


On 1st of August system should lunch reversing Journal program (Manually or Automatically) So the resulting Accounting entries would be:
Account
Debit
Credit
Accrued Expense
10000
ABC Expense
10000


The supplier's invoice arrives later in August, and we record it with the following entry, which offsets the negative $10,000 that would otherwise have appeared in the company's income statement in August.
Account
Debit
Credit
ABC Expense
10000
Supplier Account
10000


The result is that the $10,000 expense appears in the company's income statement in July, while there is no net recognition of any expense at all in August. If we won’t consider reversing journal entries it will result into recording expenses in both July and August
Similar is the case of Account receivables, You accrue $10,000 of revenue in January, because the company has earned the revenue by Providing services to XYZ Corp but has not yet billed it to the customer. You expect to invoice the customer in February, so you create a reversing entry in the beginning of February to reverse the original $10,000 revenue accrual. The final billing, for a total of $10,000, is completed later in the month. The net result is the recognition of $10,000 in revenue in January, followed by no recognition of revenue in February.
When you create a journal entry you want to automatically reverse, specify a journal category that has assigned reversal criteria. Your journal will be reversed based on the method, period and date criteria you defined for that journal category.


General Ledger generates and posts reversals for journals that satisfy the following conditions:
  • The journal balance type is Actual.
  • The journal category is enabled to be Auto-reversed.
  • The journal is posted but not yet reversed.
  • The journal reversal period is open or future enterable.

We can set Profile option GL: Launch Auto-Reverse After Open Period to YES to automatically lunch reverse journal program when you open a new GL period.


All reversal journals with Auto-Reverse and Auto-Post enabled will be generated and posted according to the reversal criteria you defined.

Journal Posting Issue and resolution


Issue:-
GL period was closed before closing the payable period because of that many of the journal entries remain un-posted in GFP as entries stuck into GL interface table.
As P3 is now closed we can’t post these entries into P3 and if we delete data from interface we can’t get it back from sub-ledger as the sub-ledger period is already closed so all transection would be accounted and Posted.
We can delete the data from sub-ledger and again import the data from spreadsheet or any other feeder system but not possible from sub-ledger.
So the only solution remain is to post the data in very next period of GL, defiantly you won’t be able to reconcile GL and sub-ledger for that specific period but during next period posting it can be taken care by business and it won’t result into unbalancing at fiscal end.

Fix Summary:-
As per agreed action plan if you want to go for posting the P03 batch into P04 (no other posting activities are allowed from Payables during this is being performed):
1.    GL posts every AX Payables batches (P04 ones) which can be there may be waiting for posting. To have a clean starting point.
2.    Unfreeze the Journal batch source, once the Journal source is unfreeze GL dates can be changed from Journal import correct window or even threw Journal Batch


3.    GL changes the period of those batches to P04 


4.    GL posts the batches into P04
5.    Freeze the Journal source again.

Cash Management: Cash Cycle


Cash Management: Cash Cycle


Oracle Cash Management is an enterprise cash management solution that helps you effectively manage and control your cash cycle. It provides comprehensive bank reconciliation and flexible cash forecasting.

Oracle Cash Management is used to reconcile transactions on the (electronic) bank statements against recorded transactions in Accounts Payables and Accounts Receivables. You can also create miscellaneous transactions for bank-originated entries, such as bank charges and interest 

The Bank Reconciliation function enables you to eliminate errors and control cash outflow. Financial audits require that you should reconcile your bank accounts with bank statements to locate errors and frauds. For this reason, you should reconcile your bank account with the bank statement every time the bank sends you a statement. The Oracle Cash Management system's bank reconciliation function enables you to identify and fix the causes of non-reconciliation of bank balances with bank statements and enables you to maintain accurate cash balances.

Since Cash Management doesn’t have an own posting into GL, all transactions go through Accounts Payables or Accounts Receivables. The “Miscellaneous Transactions” will flow through Accounts Receivables into GL. 

There are two major process steps you need to follow when reconciling bank statements:
1.    Load Bank Statements: You need to enter the detailed information from each bank statement (SWIFT MT940) including bank account information, deposits received by the bank, and payments cleared. You can enter bank statements manually or load electronic statements that you receive directly from your bank.
Auto-Reconciliation needs the imported bank statement line to pass these checks:
·         The currency code on the statement line must be defined in the system.
·         The bank transactions code must be defined.
·         The exchange rate type must be of valid type defined.
·         The amount must be entered for the statement.
·         Multi-Currency Validation

2.    Reconcile Bank Statements: Once you have entered detailed bank statement information into Cash Management, you must reconcile that information with your system transactions. Cash Management provides two methods of reconciliation:
o    Automatic- Bank statement details are automatically matched and reconciled with system transactions. This method is ideally suited for bank accounts that have a high volume of transactions.
o    Manual- This method requires you to manually match bank statement details with system transactions. The method is ideally suited to reconciling bank accounts that have a small volume of monthly transactions. You can also use the manual reconciliation method to reconcile any bank statement details that could not be reconciled automatically

The Bank Statement Open Interface table consists of two tables:
·         The Bank Statement Headers Interface Table: Contains header-level information. The name of the table is CE_STATEMENT_HEADERS_INT_ALL. This table must contain exactly one record for each bank account within a bank statement.
·         The Bank Statement Lines Interface Table: Contains transaction-level information from the bank statement. This table is named CE_STATEMENT_LINES_INTERFACE.
Run the Bank Statement Import Program, which is a concurrent program, to transfer the information from the interface tables to the bank statement tables in Oracle Cash Management.

Types of animations

Animation is a diverse and creative field with a variety of styles that artists and filmmakers use to bring their visions to life. Here are ...